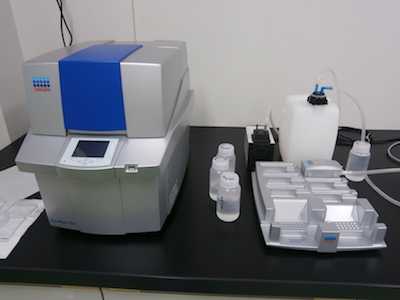
Pyrosequencing protocol for PyroMark Q24
1. Primer designing
Pyrosequencing requires three primers, a pair of forward and reverse primers and a third sequencing primer. The forward and reverse primers used to amplify 80 to 500 bp DNA fragment containing the SNP of interest by standard PCR and a third sequencing primer is used to sequence a short region around the SNP of interest by pyrosequencing. One of the forward or reverse primers should be biotin-labeled. It is advisable to test the PCR with unlabeled primers before ordering labeled primers as biotin labeled primers are expensive. Only primer combinations that give a fragment with clear, bright and single band corresponded to the size of the amplicon should be used for pyrosequencing. Hence, it is advisable to run the PCR product on a gel for longer time (at least for one hour). The PCR product should also be free from primer dimers.
The biotin can be labeled in one of the PCR primers (forward or reverse) depending on the direction of the sequencing primer. When the sequencing primer is forward, the reverse primer should be biotin labeled at the 5´ end. The forward primer should be biotin labeled at the 5´ end when a reverse sequencing primer is used. However, one can easily get all the primers using Pyrosequencing Assay Design Software (Biotage). The software automatically generates 100 primer sets that include both PCR and sequencing primers. Each primer set is given a quality score based on several parameters that are specific for Pyrosequencing analysis.
Data analysis of the pyrosequencing results becomes less precise when the SNP is part of a polynucleotide greater than 3. As an example: TT[C/T]GCAG··· as sequence after the sequencing primer cannot be analyzed precisely, the software will give warnings; the SNP is part of polynucleotide greater than 3. You will have to make your sequencing primer longer, resulting in: [C/T]GCAGA··· as sequence after the sequencing primer. Polynucleotides greater than 3 that are part of your SNP are not rare. You´ll have to play around with the design of the sequencing primer in order to get analyzable template.
2. PCR
- Place 3 μl of DNA into the bottom of PCR tube, and then, dispense 12 μl each of Reaction mix.
Component Volume Reaction mix (xn) DNA (5 ng/μl) 3 μl - 2x Ampdirect Plus 7.5 μl (1x) 7.5 x n μl BIOTAQ HS DNA Polymerase (5 units/μl) 0.06 μl (0.3 units) 0.06 x n μl 3 μM Forward primer 1.5 μl 1.5 x n μl 3 μM Reverse primer 1.5 μl 1.5 x n μl Sterile water 1.44 μl 1.44 x n μl Total 15.0 μl 12 x n μl
- PCR [95°C 10 min, 45-50 cycles (95°C 30 sec, Ta°C 30 sec, 72°C 1 min), 72°C 10 min, soak at 4°C]
- Check 2-2.5 μl on a 2.0% agarose gel in 1x TAE buffer.
3. Pyrosequencing
- Insure that all the necessary buffers, enzyme, substrate and reagents are available (if not prepare them).
- Open the lap top computer and prepare Assay and Run files in the PyroMark Q24 software and copy the Run file to the USB stick.
- Click on a software ‘PyroMark Q24’.
- File , New Assay, AQ Assay.
- Fill the box under ‘Sequence to analyze’ and click on ‘Generate Dispensation Order’ and save the file (Assay file).
- File, New Run.
- Select Instrument Method, click in box A1 under ‘Plate Setup’, right click placing the curser in box A1, select ‘Load Assay’, select the Assay file, drag the cursor (being in the first raw of box A1) to copy in other boxes.
- Save the file (Run file) and copy it to the USB stick. Don´t close the software, later you need to get volume information for enzyme, substrate and dNTPs.
- Heat the heating block to 80°C and put on the Pyrosequencing instrument.
- Prepare the PCR product mixing with streptavidin beads and binding buffer.
- Prepare the above mix (no. 4) in each well of a 24 plate (cut from a 96 PCR plate or other). Seal the PCR plate using adhesive foil and put it on a shaker.
- Prepare annealing buffer and primer mix in PyroMark Q24 plate (22.5 μl annealing buffer + 2.5 μl sequencing primer (3 μM) in each well)
- Separation of DNA strands and release of samples into the PyroMark Q24 Plate.
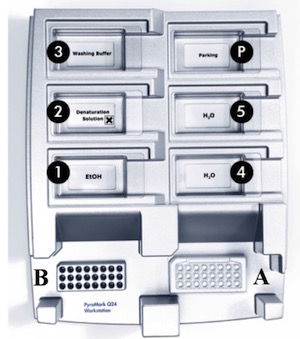
- Put the PyroMark Q24 plate in position A, as indicated right.
- Fill five separate troughs with solutions as shown right (to the level indicated in the troughs).
- Switch on the pump and open the vacuum switch.
- Put the prep tool in position 5 and clean it in sterile distilled water for about 20 seconds. While cleaning the prep tool, remove the PCR plate from the shaker and place it in position B.
- Hold the prep tool upright until all water is sucked out.
- Carefully lower the filter probes into the PCR plate to capture the beads containing immobilized template. Hold the filter probes in place for 15 seconds. Take care when picking up the tool.
- Ensure that all liquid is removed from the wells and that all beads have been captured onto the filter probe tips.
- Place the prep tool
- in 70% ethanol for 5 seconds (position 1)
- in 0.2 M NaOH for 5 seconds (position 2)
- in washing buffer for 10 seconds (position 3) and hold the prep tool upright for 5 seconds
- Place the prep tool over the PyroMark Q24 plate (A). Don´t enter the buffer. Close the vacuum switch, and the beads will drop in the buffer. After switching off you can enter the buffer with the tool to release all beads in the buffer. Shake the tool gently for 15 seconds.
- Transfer the tool to the trough containing water (position 4) and put on the vacuum switch
- Put the PyroMark Q24 plate with single stranded template at 80°C for 2 minutes
- Hold the prep tool upright until all water is sucked out of the system, put off the vacuum switch and pump and then put the prep back into its place (position P).
- Let the PyroMark Q24 plate cool down to room temperature
- Put off the heating block
- Fill the PyroMark Q24 Cartridge with enzyme, substrate and dNTPs and place the cartridge into the pyrosequencing instrument
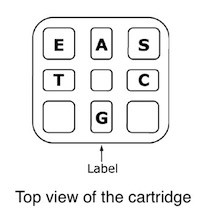
- Place the cartridge on the table, the label towards you.
- In the lap top computer, in PyroMark Q24 software, click on ‘Tools’, then on ‘Pre Run information’. Pipet each dNTPs, enzyme and substrate according to the calculated volume in their respective place as shown right.
- In the pyrosequencing instrument, open the cartridge gate and insert the filled reagent cartridge with the label facing out. Push the cartridge in fully and then push it down.
- Open the plate-holding frame and place the PyroMark Q24 plate on the heating block inside the instrument.
- Close the lid of the instrument.
- Running the pyrosequencing
- Insert the USB stick containing the Run file into the USB port at the front of the instrument.
- On the instrument screen, select ‘Run’ using up and down button and then ‘OK’.
- Select the Run file, press ‘Select’.
- After the run, data are automatically transferred to the USB stick. When the instrument confirms that the run file has been saved to the USB stick, press ‘Close’.
- Move the processed Run file from the USB stick to the lab top running PyroMark Q24 Software.
- Open the Run file by double-clicking.
- In the ‘Overview’ tab, click on ‘Analyze all’.
- From the ‘Reports’ menu, click on ‘AQ Pyrograms Report’, select 3 rows, 2 columns in landscape orientation and save it.
- Save ‘AQ Analysis Results’ as Tab delimited TSV file.
- Shutting down the instrument
- Open the instrument lid.
- Open the cartridge gate and remove the reagent cartridge by lifting it up and pulling it out.
- Close the gate.
- Open the plate-holding frame and remove the plate from the heating block.
- Close the plate-holding frame and the instrument lid.
- Using the up and down screen buttons, select ‘Shutdown’ from the main menu and press ‘OK’. When the message ‘It is now safe to turn off the instrument’ appears, switch off the instrument. The power switch is located at the rear of the instrument.
- Cleaning
- If the plate is to be reused, clean it by distilled water.
- Clean the cartridge with distilled water: fill it to the top and press each of the five different channels with your finger (wear gloves) until the water comes out of the channels.
- Clean the six troughs by distilled water.
- Add distilled sterilized water to slightly below the line of 1000 ml in the 1000 ml bottle, label it as ‘0.2 M NaOH’.
- Measure approximately 8 g of Sodium hydroxide, and add into the bottle with stirring on a magnetic stirrer (a stir bar sitting in the bottle).
- After dissolved completely, fill up to 1000 ml with distilled sterilized water.
- Store at room temperature. Caution: sodium hydroxide is irritating to eyes and skin.
- Add distilled sterilized water to 900 ml in the 1000 ml bottle, label as ‘Washing buffer’.
- Measure approximately 1.21 g of Tris-Acetate, and add into the bottle with stirring on a magnetic stirrer (a stir bar sitting in the bottle).
- Adjust pH to 7.6 with 4 M Acetic acid.
- After dissolved completely, fill up to 1000 ml with distilled sterilized water.
- Store at room temperature
- Slowly add 11.5 ml of the stock solution to 12.5 ml distilled sterilized water in 100 ml tube.
- Adjust the final volume of solution to 50 ml with distilled sterilized water.
- Store at room temperature
| Component | Volume |
|---|---|
| PCR product | 10 to 15 μl (depending on the band intensity of the PCR product) |
| Sterile water | 29 to 24 μl (depending on the volume of the PCR product) |
| Streptavidin beads* | 1 μl |
| Binding buffer | 40 μl |
| Total | 80 μl |
Appendix: Preparation of denaturation and washing buffers
Denaturation solution (0.2 M NaOH)Washing buffer, pH 7.6
4 M Acetic acid
To make 50 ml of a 4 M solution,